Before You Vent Through the Roof: RTVP-4 Kit Guide
Introduction
If you are working through a venting setup for a heater, a rooftop vent kit is one of those components you do not want to guess on. The RTVP-4 four inch rooftop vent kit is built to provide the core rooftop assembly pieces, the transition through the ceiling, and the parts needed to properly finish and seal the termination.
Below is a clear breakdown of what comes in the RTVP-4 kit, how those parts work together, and the key installation points that matter most, including the venting material requirements and the rooftop setback measurement.
What Comes in the RTVP-4 4 Inch Rooftop Vent Kit
This kit is designed around a 4 inch rooftop cap and the supporting roof and interior components. Here are the parts included:
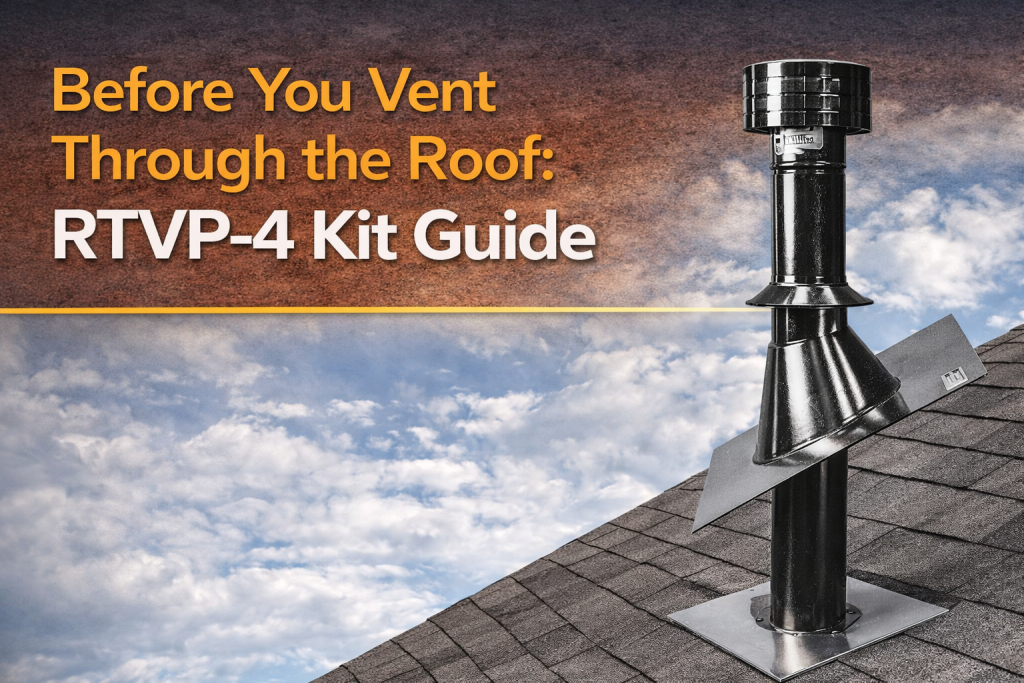
1) 4 inch rooftop cap (roof termination)
This is the main rooftop termination piece included in the kit, part of the RTVP-4 rooftop vent kit assembly.
2) Storm collar
The storm collar is installed above the flashing on the exterior side of the roof. Its job is to help manage weather exposure at the penetration point.
3) 4 inch roof flashing
The roof flashing is included and can be used on both pitched roofs and flat roofs.
4) 4 inch fire stopper
A 4 inch fire stopper is included and mounts into the ceiling. This is the part that helps maintain the safety barrier where the vent passes through the structure.
5) Transitional adapter (single wall to double wall)
The kit includes a single wall to double wall adapter. This is important because the venting layout is not “one size fits all” through the entire building.
The setup works like this:
- You run double wall pipe through the ceiling and attic space and then out through the roof.
- From the end of the heater to wherever your vent stack begins, you need single wall vent pipe.
- The adapter connects the single wall vent pipe to the double wall vent pipe.
6) 90 degree elbow (start of the vertical stack)
Once you start building the vertical stack, you have options. The kit provides a 90 degree elbow that can be used to begin that vertical run.
7) 4 inch clean-out tee with cap (maintenance access)
Instead of starting with the 90 degree elbow, the kit also provides a 4 inch clean-out tee that can be used to access dirt or contaminants that collect in the flue vent over time.
This includes a cap so you can remove it for yearly or annual maintenance.
8) High temperature silicone sealant
High temperature silicone sealant is included and should be used on every vent connection piece in your flue venting sections.
Important Item Not Included: 5 Foot 4 Inch B-Vent Pipe
One thing to plan for up front: the kit does not include a 5 foot, 4 inch B-vent pipe.
That length is often needed to get through the attic space and roof. It can be supplied as an additional item depending on how much vent pipe your project requires.
Key Installation Requirements and Order of Operations
The kit includes an installation guide with diagrams showing the order of components. While the exact path depends on your heater and building layout, the major requirements stay the same.
Use single wall pipe only where it is required
A critical rule is that you must use single wall vent pipe from the end of the heater to the point where your draft hood connector begins.
The RTVP-4 kit documentation also lays out the separate pieces and the sequence they go in.
Transition to double wall through the ceiling and attic
After the draft hood connector portion, you transition into the double wall pipe that runs through the ceiling and attic space and then out through the roof using the included transitional adapter.
Rooftop Placement: 24 Inches Off the Roof Line
Another key measurement requirement is the rooftop termination location.
You need to be 24 inches off of the roof line before your vent cap begins.
This is called out in the assembled rooftop kit diagram, and it is one of the details that keeps the termination placed correctly for the system.
Quick Part-by-Part “How They Fit Together”
Here is how the included pieces generally relate to one another in a typical rooftop venting setup:
- Single wall vent pipe runs from the end of the heater to the draft hood connector area.
- Transitional adapter connects single wall to double wall.
- Double wall pipe continues through the ceiling and attic space and approaches the roof.
- Fire stopper mounts into the ceiling to address the structural penetration.
- Roof flashing seals and manages weather at the roof penetration.
- Storm collar goes above the flashing on the exterior side.
- Rooftop cap completes the termination at the roof level.
- Elbow or clean-out tee supports the start of the vertical section and provides either an initial turn or maintenance access.
Why the Included Sealant Matters
Vent connections depend on proper sealing. The RTVP-4 kit includes high temperature silicone sealant, and it should be used on every vent connection piece where sections join.
If You Have Questions About Roof Venting
If your roof type, pipe run length, or vent path raises questions, reach out before locking things in. Roof venting and venting materials are detail-driven, and the correct parts and measurements matter.
When projects involve roof penetration, the setback measurement and the single wall to double wall requirements are especially important. If you are unsure whether you need the additional 5 foot 4 inch B-vent pipe for your run, it is best to confirm based on your specific layout.
Give us a call, send an email, or fill out our Project Details form—we’re here to help.
📞 (888) 501-0252
📧 sales@glradiant.com
🌐 www.glradiant.com