Best Practices for Hanging Radiant Tube Heaters
Best Practices for Hanging Radiant Tube Heaters
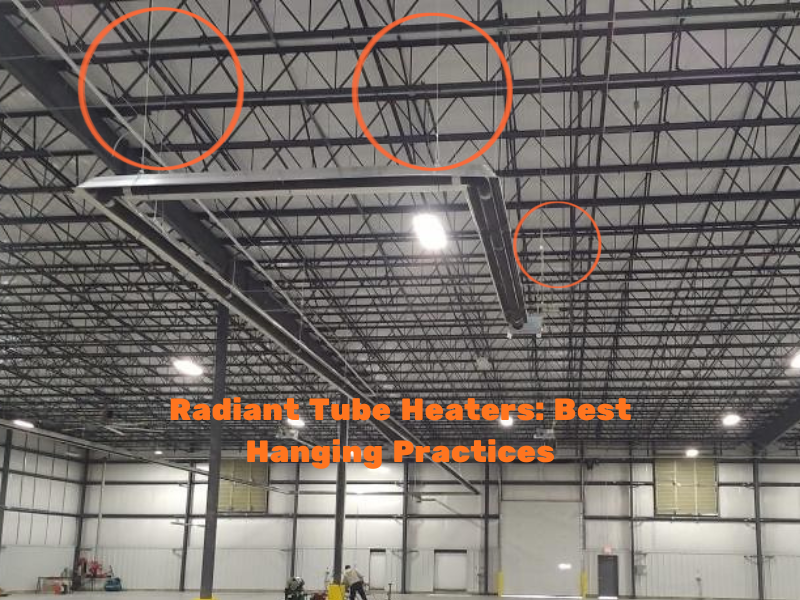
Proper mounting is one of the most important steps when installing Radiant Tube Heaters. The right hanging method keeps equipment secure, ensures even heat distribution, and helps the heater perform reliably over time. This guide walks through common hanging options, handy installation tips, and when to choose each approach for indoor and sheltered outdoor spaces.
Why Hanging Method Matters
Radiant Tube Heaters are long, often heavy fixtures that must be supported safely and at the correct height. A poor mount can lead to sagging, vibration, noise, or even failure of mounting hardware. Selecting the correct hanging option for the environment—indoor, covered patio, or exposed outdoor—keeps the heater stable and makes future adjustments easier.
Three Common Hanging Options
Below are three practical hanging solutions used on most installations in non-windy environments: a standard chain set, a screw-in chain, and a 10-foot hanging cable (gripple style). Each option is durable and installer-friendly when used as intended.
1. Chain Set (part number THCS)
The chain set is the most common solution for Radiant Tube Heaters. It usually comes as a 5-foot chain with two S-hooks.
- How it works: Wrap the chain around a beam, eye bolt, or beam clamp and hook the S-hooks to the heater hanger.
- Pros: Simple, inexpensive, and easy to shorten with bolt cutters.
- Tips: Always clamp down or bend the S-hook gap closed after hanging to prevent accidental slips.
2. Screw-in Chain (part number RVA-CS)
This option screws directly into wooden structure members and provides a semi-permanent mount point for the S-hook and hanger.
- How it works: Drive the screw-in loop into a joist or beam and hang the heater from an S-hook.
- Pros: Clean install with a secure, anchored point suitable for wood structures.
- Tips: Confirm the structural member can carry the load and use the appropriate screw length and type for your substrate.
3. 10-foot Hanging Cable / Gripple (part number THGH10)
The gripple-style cable is a favorite among mechanical and HVAC contractors for its adjustability and clean appearance.
- How it works: Loop the cable around a structure or attach to an eye bolt, run the heater hanger through the loop, and cinch the cable to the exact height.
- Pros: Easy to adjust, very secure, and allows fine height control. A small tail is snipped off after tensioning.
- Tips: If you need to lower or raise later, many systems have a release button to back the cable out before re-tensioning.
Installation and Safety Tips
- Use the right hardware: Choose S-hooks, eye bolts, or beam clamps rated for the load. Check manufacturer specs.
- Secure S-hook gaps: Close and clamp S-hook openings after hanging to prevent accidental dislodging.
- Cut chains cleanly: Shorten chains with bolt cutters and smooth any sharp edges before finalizing the hang.
- Adjustability: For frequent height changes or precise alignment, use a cable/gripple system for quick adjustments.
- Environment matters: These hanging options are best for indoor or sheltered areas. For windy or exposed locations, use rigid mounts such as threaded rod or engineered hangers designed for outdoor loads.
- Follow code and manufacturer guidance: Confirm recommended mounting heights, clearance requirements, and local building codes before final installation.
Choosing the Right Method For Your Space
For most shops, garages, warehouses, and covered patios, the chain set or screw-in chain offers a quick and economical solution. If you want a more finished look and the ability to micro-adjust height, the 10-foot gripple cable is a great choice.
When installation will face strong wind or constant vibration, opt for rigid mounting hardware that prevents movement. Always verify structural attachment points and consider consulting a structural or mechanical pro for large arrays of Radiant Tube Heaters.
Quick Checklist Before You Finish
- Confirm the hanger and hardware are rated for the heater weight.
- Ensure attachment points (joists, beams, eye bolts) are structurally sound.
- Close or clamp S-hooks and trim any sharp chain ends.
- Follow clearance and mounting-height guidance from the heater manufacturer and local codes.
- Use cable/gripple systems for fine adjustments or repeated changes.
Final Thoughts
A small investment in the correct hanging method saves time and headaches down the road. Whether you choose a simple chain set (THCS), a screw-in chain (RVA-CS), or a 10-foot gripple cable (THGH10), focus on secure attachments, proper clearance, and easy adjustability to keep Radiant Tube Heaters performing safely and efficiently.
Need help with Hanging Radiant Tube Heaters?
Our team at Great Lakes Radiant can review your layout, confirm required clearances, and help ensure your radiant tube heater installation is safe, compliant, and properly configured for your space.
Give us a call, send an email, or fill out our Project Details form so we can help you install your radiant heater correctly the first time.