Radiant Tube Heater Installation – Common Mistakes!
Introduction
Instruction manuals—those thick booklets that often gather dust—are essential when setting up anything, including Detroit Radiant Products – ReVerberRay radiant heat tube heaters. From basic installation steps to wiring diagrams, these manuals can make or break your installation experience. But even if you diligently follow the instructions, things can still go awry. That’s where our handy tips come in! Make sure your Radiant Tube Heater Installation goes well!
Here is a link to the Detroit Radiant Products ReVerberRay General Tube Heater Manual. This manual applies to most ReVerberRay heater radiant tube models, but not all.
Top Common Installation Mistakes of Radiant Tube Heater Installation
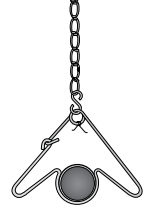
- Chain/Cable Mounting: When hanging your heater, make sure those chains or cables go straight up and down. This prevents unsafe pulling in different directions. Follow the manual’s guidance for proper chain placement.
2. Hanger Placement: The first ten-foot tube after the burner box needs two hangers—one near each joint. Every subsequent tube should have a hanger near its following joint. This ensures load distribution and supports the reflectors.
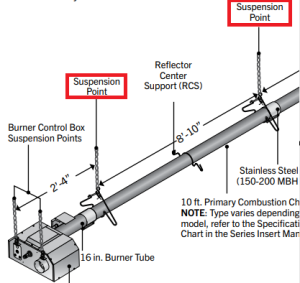
3. Tube Placement: For heaters with 150,000 BTUs or more, the special combustion tube (marked with an orange sticker) should be the first ten-foot tube after the burner box.
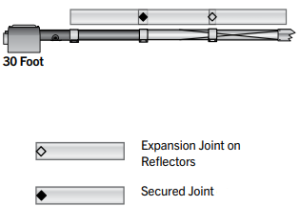
4. Reflector Security: Most reflector joints should be secured, except for one expansion joint per heater. The manual specifies which joint to leave as an expansion point for proper unit expansion and contraction.
5. Clamp Positioning: Install clamps at the center of tube seams (where two tubes meet) and follow torque guidelines. This prevents unsafe tube separation.
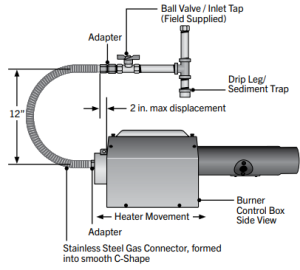
6. Gas Flex Line Connection: The flexible gas line coming into the heater should form a gentle “C” shape between the shut-off valve and the back of the burner box. This accommodates expansion and contraction without stressing the connector.
7. Common Venting: If you’re venting two units together, they must share the same thermostat or control. This prevents exhaust gasses from one heater traveling down the non-operating heater.
8. Baffles: Baffles belong in the last tubes of the unit. They retain warmth rather than letting it escape through the vent. Installing baffles at the beginning of the unit can cause burn-through, fire hazards, and inefficient heating.
Conclusion
Remember, Great Lakes Radiant is here to assist you during radiant tube heater installation and for any ReVerberRay heater troubleshooting. Infrared Heater safety is paramount! And once your infrared tube heater is up and running, we’re ready to troubleshoot any issues you may encounter, for the entire life of your ReVerberRay heater! 😊🔥
Give us a call, email, or fill out our Project Details form so we can start working on a radiant heat solution for your project!
Phone: (888) 501-0252
Email: sales@glradiant.com
Website: www.GLRadiant.com