Digital Thermostat Wiring: What You Need to Know
Introduction
Low voltage thermostat wiring sounds simple until you realize one big thing: most modern thermostats are digital, and digital thermostats need constant power. That means if you rely on batteries alone, you could lose heat at the worst time, like over a weekend when nobody is around to notice the battery warning.
A smarter approach is to power the thermostat constant power directly from the burner box. That keeps your thermostat running consistently, even if batteries die.
Why constant power matters for digital thermostats
Digital thermostats require steady power. Many homeowners do not realize that these thermostats are not truly “standalone” just because they display and control temperatures. They still need power to keep the system electronics stable.
By pulling a common constant power wire from the burner box, you remove the batteries from the equation (or at least reduce how much they’re needed). If the batteries ever fail, you do not have to worry about your shop going without heat.
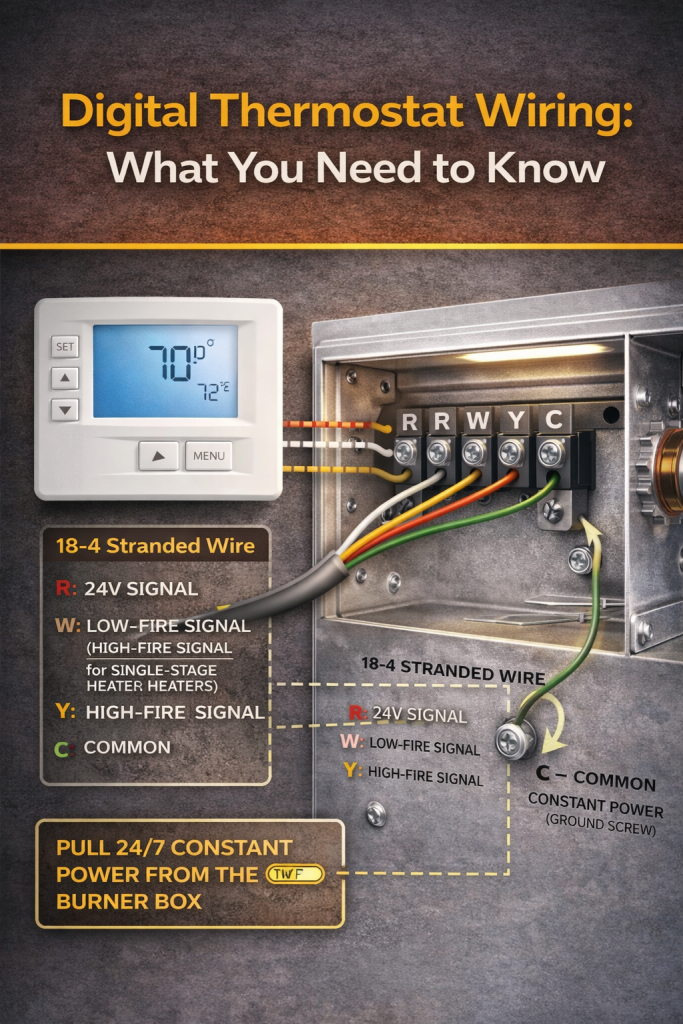
Two-stage heaters: use 18-4 low voltage wire
For common two-stage setups with a digital non-programmable or programmable thermostat, a solid standard is to run 18-4 stranded wire for the low voltage wiring.
An 18-4 wire gives you four conductors. In practical terms, you will use them like this:
- Three wires that go to the burner box spade terminal connector(s)
- One common wire that provides constant power back to the thermostat
How to connect the 18-4 on a two-stage burner box
Once your spade terminal connectors are crimped onto the three signal wires, you connect them to the burner box terminal strip:
- 24-volt signal wire
- Low-fire signal wire
- High-fire signal wire
Then use the fourth wire (the common constant power):
- Attach it to any of the metal screws on the burner box
- For convenience, it is easiest to connect it right next to the terminal strip
- Loosen the screw, secure the wire, and tighten it back down
That is the proper finished approach for an 18-4 two-stage low voltage wiring setup with a digital thermostat.
Single-stage 24-volt heaters: understand which signals are active
Single-stage burners are a little different. On a single-stage setup, the burner box typically has the high-fire connection used, while another stage is capped off.
For example, a burner model like an HL3 may have the low fire capped off. If you see a high fire signal light on the unit, that is a good indicator that your system is operating as a single-stage (meaning you will not be signaling low-fire vs high-fire the same way you do on a true two-stage system).
Digital thermostat on a single-stage: use 18-gauge three-strand wire
When using a digital thermostat with a single-stage 24-volt heater, the wire guidance is to use 18-gauge three-strand wire.
Because you still want constant power for a digital thermostat, you will use the burner box common connection method again.
How to connect single-stage 24-volt wiring
Crimp spade terminal connectors onto the active signal conductors, then connect:
- 24-volt signal wire
- Single-stage signal wire (this is the one that corresponds to the stage that is actually used on the burner)
Then connect the common constant power wire to the burner box:
- Attach it to any of the back set screws on the burner box
- This provides the constant power feed back to the thermostat
- Tighten the screw securely once the wire is in place
Once those connections are solid, you are ready to run the thermostat control correctly.
Analog thermostats: you may not need constant power
If you are not using a digital thermostat and instead you are using an analog thermostat, the wiring approach can change.
With an analog thermostat, you typically do not need constant power sent back through the low voltage wiring. That means you can use fewer conductors depending on whether the burner requires multiple connections.
Common guidance for analog setups is:
- Two-strand wire for a single-stage analog thermostat
- Three-strand wire for high-fire signaling needs (depending on how the burner terminals are configured)
Quick checklist for clean, correct low voltage wiring
- Confirm thermostat type: digital or analog
- Confirm burner type: single-stage or two-stage
- Use the right wire size:
- Two-stage digital: 18-4 stranded
- Single-stage digital: 18-gauge three-strand
- For digital thermostats: provide constant power from the burner box common (choose a metal screw or back set screw)
- For signal wires: use the correct burner terminals (24-volt, low-fire, high-fire depending on the burner)
Bottom line
If your thermostat is digital, do not treat the low voltage wiring like it is just a signal line. Digital thermostats require constant power, and pulling common power from the burner box is a dependable way to keep your system running reliably.
Use 18-4 stranded wire for two-stage digital systems and 18-gauge three-strand wire for single-stage digital systems, then wire the signal terminals correctly and connect the constant power common to the burner box screws.
If you’re planning a heater/thermostat setup and want to confirm what type of heating system you’re working with, you can also review our guide on two-stage vs single-stage operation.
And if you’d like more background on different radiant heating approaches before choosing wiring and controls, see: ceramic vs infrared radiant heating.
Need Help Wiring Your Thermostat Correctly?
Our team at Great Lakes Radiant can help you choose the right wiring setup, confirm your system configuration, and make sure your thermostat is powered properly for reliable operation.
Whether you’re working with a digital or analog thermostat, or setting up a single-stage or two-stage heater, we’ll help you avoid common mistakes and get it done right the first time.
Give us a call, send an email, or fill out our Project Details form—we’re here to help.
📞 (888) 501-0252
📧 sales@glradiant.com
🌐 www.glradiant.com