Sidewall Venting: 4DSK Overview
Introduction
If you are planning Sidewall Venting for a sidewall penetration, the details matter. A solid setup means safer operation, fewer surprises, and cleaner long-term performance. This guide breaks down the 4DSK sidewall vent kit (4 inch) and highlights the best-practice installation points that keep venting working the way it should.
What the 4DSK Kit Is Designed For
The 4DSK kit is the accessory sidewall option Great Lakes Radiant typically recommends when you are venting through a sidewall. It is built for proper transition from the heater to the vent run that passes through the wall, then out through an exterior cap designed for real-world wind and weather conditions.
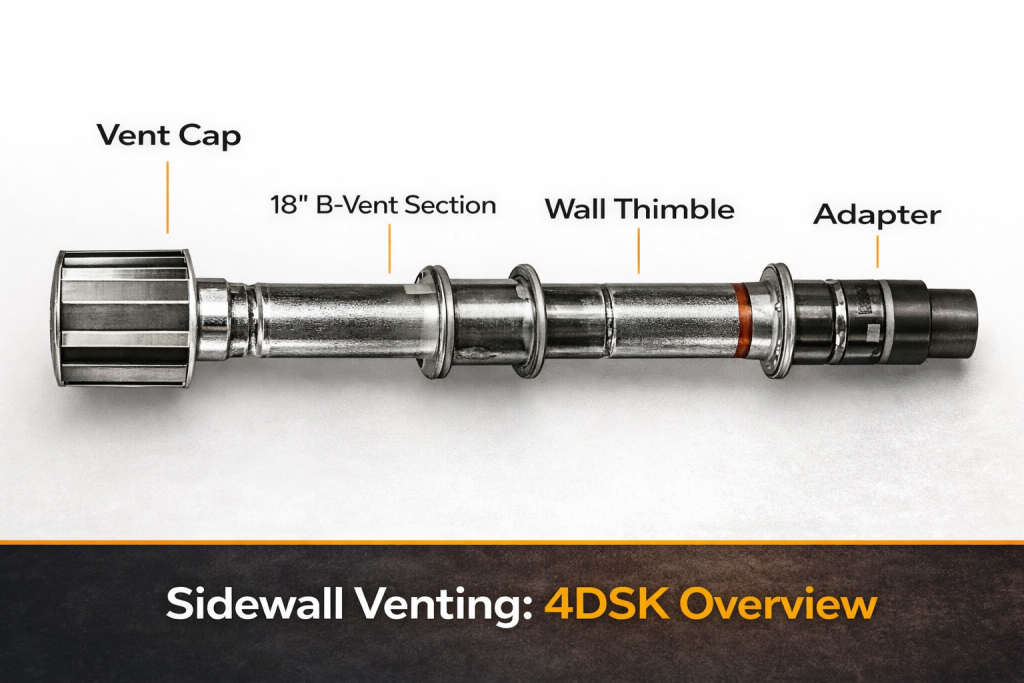
Below is a clear look at the pieces that come with the kit, plus the one key material you will need to supply yourself.
Inside the 4DSK Vent Kit: Piece by Piece
1) Vent Adapter Piece (Transition Between Pipe Types)
On the kit, the vent adapter piece connects a single-wall vent pipe to a double-wall vent pipe.
Important note: you cannot connect two sections of double-wall vent pipe together directly. That is why this adapter exists: it bridges the correct pipe types at the end of your heater.
2) 18 Inch B-Vent Section
The kit includes an 18 inch piece of B-vent. This portion pairs with the adapter and forms the section that travels through the wall penetration area.
3) Wall Thimble (Sleeve Through the Wall)
The wall thimble is the protective passage between the exterior wall and the interior wall.
Think of it as shielding the structure around the penetration. It is adjustable and can be extended outward. The maximum extension is 6 3/4 inches.
4) Sidewall Vent Cap (High-Wind, Certified)
The last component included with the kit is the sidewall vent cap. This cap is a high wind cap that is certified for use with the heaters used with this venting system.
Great Lakes Radiant specifies a manufacturer recommendation here as well: the cap is made by Duravent, which they note works very well in practical installs.
What You Need to Supply: High-Temperature Silicone Sealant
Not included with the vent kit, but required for a proper Wall Venting setup, is silicone sealant.
- Use a high-temp red silicone sealant.
- It is easy to see from the outside of the pipe for inspection.
- It is designed to stand up to high temperatures.
Sidewall Venting Best Practices (Critical Installation Checks)
Once the kit pieces are identified, the next step is getting the installation details right. These are the key guidelines that help prevent moisture problems and keep clearances compliant.
Keep the Vent Pipe Sloped: Quarter Inch Per Foot
To prevent moisture in the system, the vent pipe should be sloped at 1/4 inch per foot of length.
Be careful here: you do not pitch the heater. You pitch the vent pipe so any condensate flows toward the exhaust cap.
Plan Around Overhangs: 36 Inches Rule
If the installation is below a building overhang, the vent cap location matters.
- The vent cap must be at least 36 inches below the overhang, or
- the cap must extend past the overhang on the outside of the building.
Maintain Clearances From the Wall and Exterior
The vent cap needs breathing room for safe operation.
Maintain 6 inches of separation between the vent cap and the side wall exterior of the building.
Sealing and Fastening: Don’t Skip These Steps
Two final habits make a big difference for Wall Venting reliability over time.
Seal All Vent Connection Joints
Use your high temperature silicone sealant to seal all of your vent connection pieces.
Use #8 Sheet Metal Screws Where Needed
When your connection does not include a quick connect feature (like those provided by Duravent), connect the vent pieces using #8 sheet metal screws.
Quick Checklist for a Clean Sidewall Venting Setup
- Transition correctly using the vent adapter from single-wall to double-wall.
- Use the included 18 inch B-vent section for the wall penetration portion.
- Install the wall thimble to protect the wall opening (adjust up to 6 3/4 inches).
- Verify cap clearance rules: 36 inches below overhang or extend past it; keep 6 inches from the exterior wall.
- Set slope on the vent pipe: 1/4 inch per foot.
- Seal every joint with high-temp red silicone sealant.
- Fasten with #8 sheet metal screws where quick connect is not provided.
Need Help Planning Your Sidewall Venting Setup?
Our team at Great Lakes Radiant can review your vent layout, confirm clearances, and make sure your 4DSK sidewall vent installation is safe, compliant, and built to perform long-term.
Give us a call, send an email, or fill out our Project Details form—we’ll help you get your venting done right the first time.
(888) 501-0252
sales@glradiant.com
www.glradiant.com