Radiant Heater Gas Connection Explained | Avoid Leaks with the Proper C Configuration
Radiant heater gas connector installation is one of the most overlooked safety details in a tube heater setup. When installed incorrectly, thermal expansion can stress fittings and cause raw gas leaks. When installed correctly — using the proper C-loop configuration — the connector absorbs movement and protects the system.
This guide explains how to install a flexible gas connector the right way, why the C configuration matters, and what mistakes to avoid.

Why Proper Radiant Heater Gas Connector Installation Matters
Radiant tube heaters expand and contract during operation. Depending on BTU output and system length, expansion can range from 2 to 6 inches. Without flexibility in the gas connection, that movement transfers stress directly into threaded fittings.
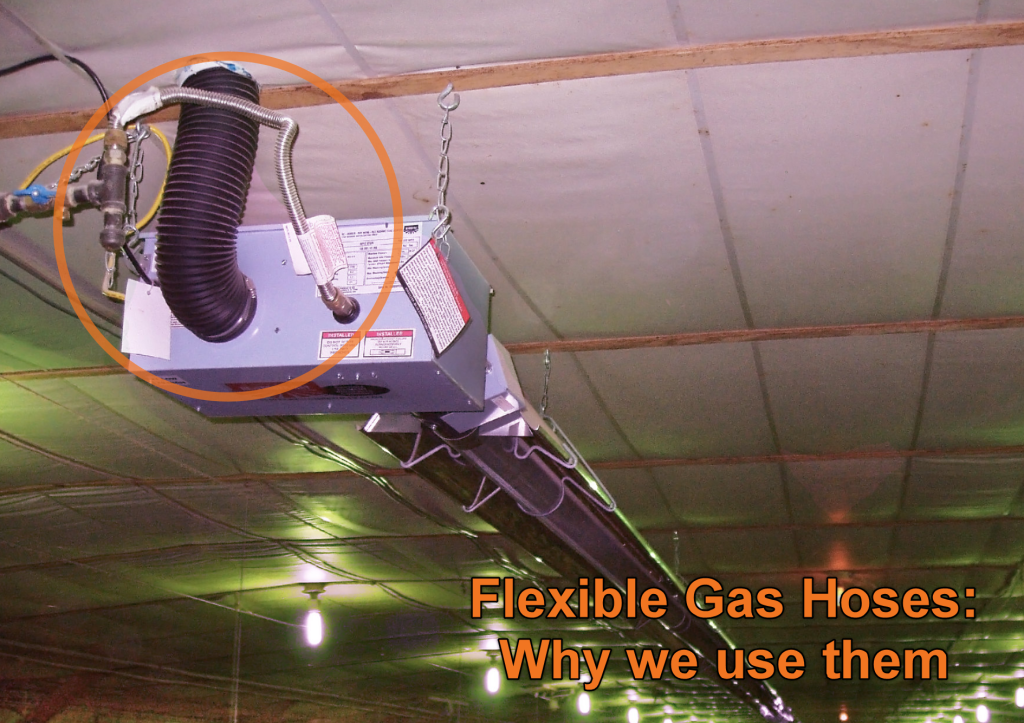
The flexible gas connector acts as a buffer between the building gas supply and the burner box. Its job is simple: absorb movement without loosening or levering fittings.
Required Components
- Flexible gas connector – Allows movement from thermal expansion.
- Ball valve – Provides local shutoff for safe servicing.
- Drip leg (sediment trap) – Catches debris before it enters the burner.
- C-loop configuration – Prevents stress on fittings during expansion.
For combustion air and fuel piping standards, refer to the
International Fuel Gas Code (IFGC)
and always follow the heater manufacturer’s installation manual.
The Correct C-Loop Configuration
The flexible connector must form a soft “C” shape. It should never be installed straight and tight.
- Keep connector nuts roughly aligned vertically within a few inches of each other.
- Allow the loop to swing left or right as needed.
- Do not torque the connector into a rigid position.
- Ensure the loop has room to flex freely.

Step-by-Step Radiant Heater Gas Connector Installation Checklist
- Install a ball valve on the supply line.
- Add a drip leg (sediment trap) per code.
- Attach the flexible gas connector at the drip leg.
- Form a gentle C-loop that allows 2–6 inches of movement.
- Keep fittings aligned — avoid angled stress.
- Orient the loop away from service doors or intake panels.
- Pressure test and leak-check after installation.
Common Installation Mistakes
- Installing the connector straight – Expansion can lever fittings loose.
- Blocking the service door – Makes maintenance difficult and increases damage risk.
- Skipping the shutoff valve – Creates unsafe service conditions.
- Over-tightening fittings – Can distort connector ends.
Safety Reminder
Gas piping installation must comply with local code. Always perform a pressure test after disturbing any gas connection. If unsure, hire a licensed gas technician.
Final Thoughts
A proper radiant heater gas connector installation takes minutes but prevents major failures. The C-loop configuration protects fittings, reduces leak risk, and improves serviceability. Follow manufacturer diagrams, install a ball valve, and ensure the connector has room to move.
Need help with radiant heater installation or gas piping layout?
Our team at Great Lakes Radiant can help review your application and ensure your radiant heater gas connector installation is safe, code-compliant, and properly configured.
Give us a call, send an email, or fill out our Project Details form so we can help you get your system installed correctly the first time.
(888) 501-0252
sales@glradiant.com
www.glradiant.com