

How to Install Radiant Tube Heater Baffles for Better Heat Control
If you run a shop, garage, warehouse, or workshop heated with radiant tube heaters, radiant tube heater baffles are one of the easiest upgrades to optimize heat direction and energy efficiency.
Baffles sit inside the final tube section, slowing exhaust flow and increasing heat transfer into the tube wall before gases exit the system so more warmth goes into the space where you need it.
The short video below shows how radiant tube heater baffles interlock and slide into the final tube section during installation.
How to determine the correct number of radiant tube heater baffles
The correct number of baffles for a radiant tube heater is always specified in the installation manual included with the unit. Each heater model and length has its own required baffle quantity, and using too many or too few can reduce performance.
To determine the correct count, locate the insert or baffle section of your installation manual and refer to the baffle quantity chart for your specific model. This chart lists the required number of baffles based on heater length and configuration.
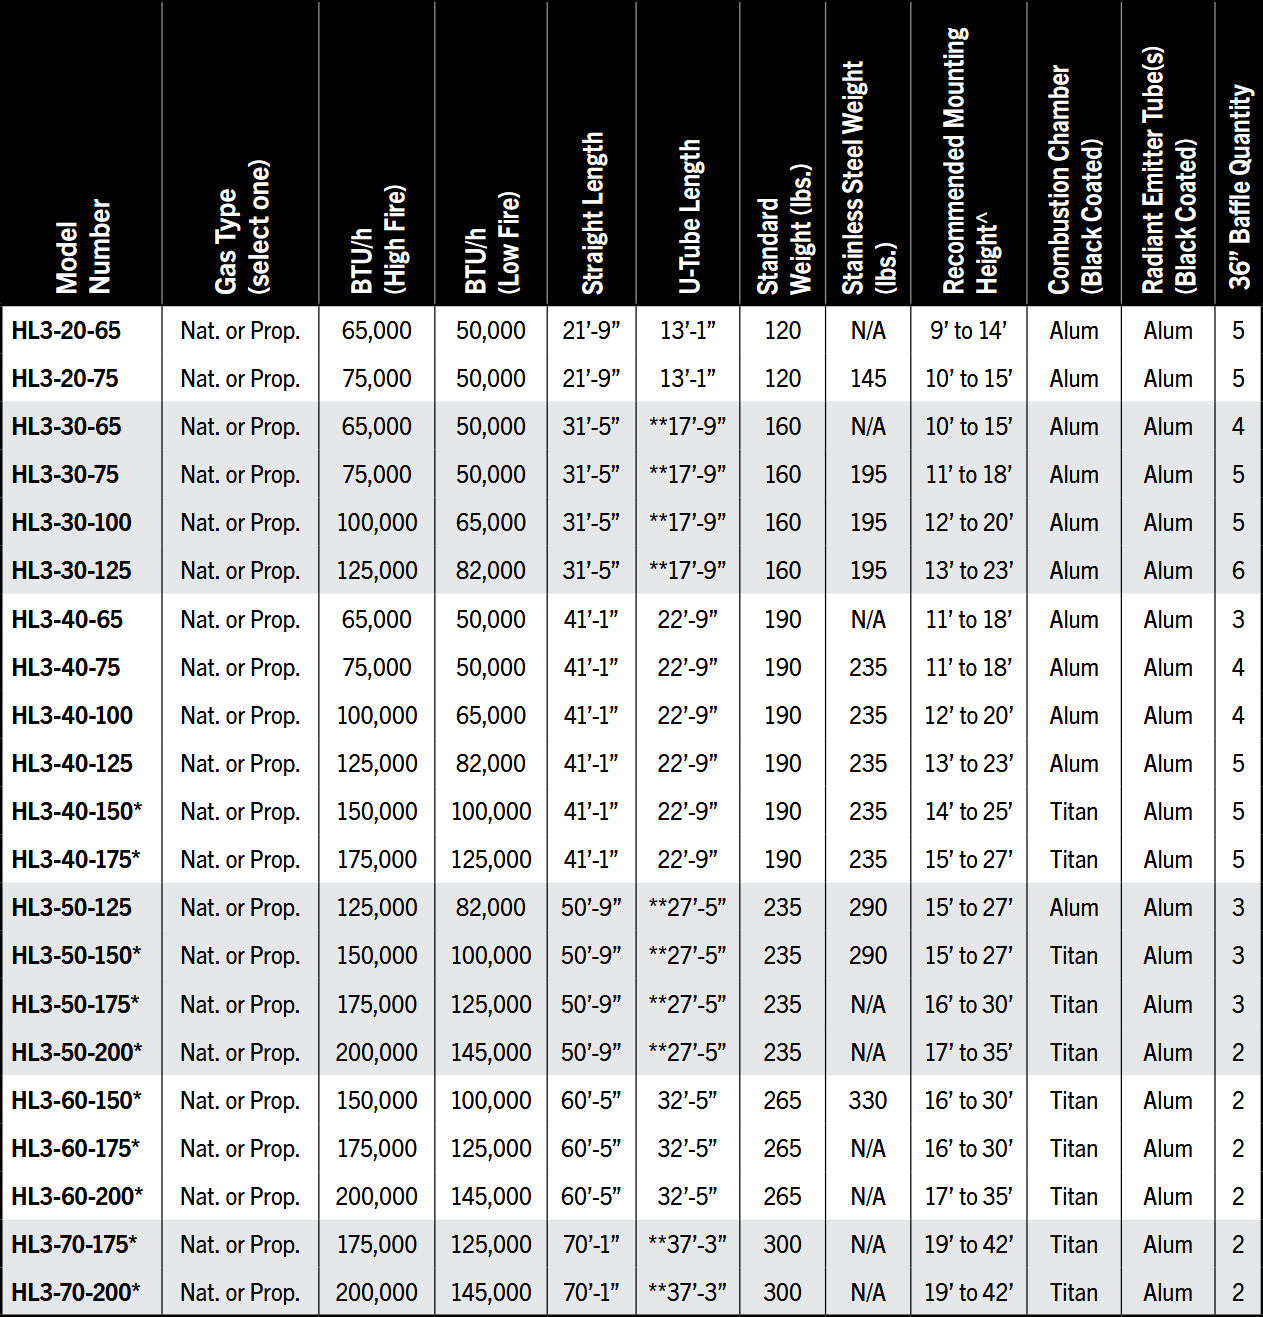
The chart shown above is from the HL3 radiant tube heater, one of our most commonly installed units, and is included here as an example. Your heater’s installation manual is the final authority and should always be used when installing or replacing baffles. Installation manuals and related documentation can be found online through our parts shop.
What baffles do and why they matter
Baffles install into the very last tube of the radiant heater. Their job is simple and effective: they spread heat across the tube and hold heat in the assembly instead of letting it exhaust at full temperature.
Example: a 40 foot unit might exhaust at 350°F with no baffles. After installing the baffles, that same exhaust could drop to 325°F or even 300°F. That drop means more heat is being directed into the building and less is being wasted outside the system.
In short, baffles increase heat transfer into the occupied space, improve directional control of the heat, and boost overall energy efficiency. This aligns with the U.S. Department of Energy’s radiant heating overview, which emphasizes directing heat toward occupied spaces rather than losing it through exhaust.
Step-by-step installation
- Confirm quantity from the installation manual chart.
- Locate the last tube of the heater where the baffles belong.
- Start sliding the first baffle into the tube. Each baffle interlocks with the next. You can assemble them one by one inside the tube or connect several on the floor and insert the whole group at once.
- Interlock carefully. Hook the next baffle tab into the previous one and slide forward to seat it. Give a small push only if needed.
- Repeat until complete. Some installations require only one or two baffles; others require four, five, or six. Follow the manual’s specified count.
- Check engagement. Make sure all tabs are fully interlocked and nothing is loose inside the tube.
Recommended tools and safety tips
- Work gloves to protect your hands from sharp edges and heat.
- Safety glasses if you are working overhead or beneath the heater.
- A stable ladder or platform to safely reach the last tube.
- A flashlight to confirm proper seating and alignment.
- Do not force tabs or bend the baffles; they should interlock smoothly.
Common mistakes to avoid
- Not checking the installation manual and using the wrong number of baffles.
- Forcing pieces together and damaging tabs, which prevents proper interlock.
- Leaving gaps or loose baffles that rattle or reduce heat capture.
- Assuming one size or layout fits every unit. Always follow the chart for your specific heater model and length.
Quick troubleshooting
- If exhaust temperature does not drop after installation, confirm the baffles are fully seated and not reversed.
- If you hear rattling, recheck interlocks and secure any loose pieces.
- If performance is still poor, verify the correct baffle type and quantity were used.
Final thoughts
Baffles are a small component with a big impact on radiant tube heater performance. Proper selection and installation redirect wasted heat back into the building, improve comfort, and reduce fuel loss. Take a few minutes to confirm the chart, assemble carefully, and seat each baffle properly. The result is more consistent, efficient heat where you need it.
Need help optimizing your radiant tube heater system?
Our team at Great Lakes Radiant can help with heater selection, accessories like baffles, and system layout to improve heat direction, efficiency, and performance.
Give us a call, send an email, or fill out our Project Details form so we can help you get more effective radiant heat in your space.